Customers / End-User Budgets
Track spend, set budgets for your customers.
Tracking Customer Spend
1. Make LLM API call w/ Customer ID
Make a /chat/completions call, pass 'user' - First call Works
curl -X POST 'http://0.0.0.0:4000/chat/completions' \
        --header 'Content-Type: application/json' \
        --header 'Authorization: Bearer sk-1234' \ # 👈 YOUR PROXY KEY
        --data ' {
        "model": "azure-gpt-3.5",
        "user": "ishaan3", # 👈 CUSTOMER ID
        "messages": [
            {
            "role": "user",
            "content": "what time is it"
            }
        ]
        }'
The customer_id will be upserted into the DB with the new spend.
If the customer_id already exists, spend will be incremented.
2. Get Customer Spend
- All-up spend
- Event Webhook
Call /customer/info to get a customer's all up spend
curl -X GET 'http://0.0.0.0:4000/customer/info?end_user_id=ishaan3' \ # 👈 CUSTOMER ID
        -H 'Authorization: Bearer sk-1234' \ # 👈 YOUR PROXY KEY
Expected Response:
{
    "user_id": "ishaan3",
    "blocked": false,
    "alias": null,
    "spend": 0.001413,
    "allowed_model_region": null,
    "default_model": null,
    "litellm_budget_table": null
}
To update spend in your client-side DB, point the proxy to your webhook.
E.g. if your server is https://webhook.site and your listening on 6ab090e8-c55f-4a23-b075-3209f5c57906
- Add webhook url to your proxy environment:
export WEBHOOK_URL="https://webhook.site/6ab090e8-c55f-4a23-b075-3209f5c57906"
- Add 'webhook' to config.yaml
general_settings:
  alerting: ["webhook"] # 👈 KEY CHANGE
- Test it!
curl -X POST 'http://localhost:4000/chat/completions' \
-H 'Content-Type: application/json' \
-H 'Authorization: Bearer sk-1234' \
-D '{
    "model": "mistral",
    "messages": [
        {
        "role": "user",
        "content": "What's the weather like in Boston today?"
        }
    ],
    "user": "krrish12"
}
'
Expected Response
{
  "spend": 0.0011120000000000001, # 👈 SPEND
  "max_budget": null,
  "token": "88dc28d0f030c55ed4ab77ed8faf098196cb1c05df778539800c9f1243fe6b4b",
  "customer_id": "krrish12",  # 👈 CUSTOMER ID
  "user_id": null,
  "team_id": null,
  "user_email": null,
  "key_alias": null,
  "projected_exceeded_date": null,
  "projected_spend": null,
  "event": "spend_tracked",
  "event_group": "customer",
  "event_message": "Customer spend tracked. Customer=krrish12, spend=0.0011120000000000001"
}
Setting Customer Budgets
Set customer budgets (e.g. monthly budgets, tpm/rpm limits) on LiteLLM Proxy
Default Budget for All Customers
Apply budget limits to all customers without explicit budgets. This is useful for rate limiting and spending controls across all end users.
Step 1: Create a default budget
curl -X POST 'http://localhost:4000/budget/new' \
-H 'Content-Type: application/json' \
-H 'Authorization: Bearer sk-1234' \
-d '{
    "max_budget": 10,
    "rpm_limit": 2,
    "tpm_limit": 1000
}'
Step 2: Configure the default budget ID
litellm_settings:
  max_end_user_budget_id: "budget_id_from_step_1"
Step 3: Test it
curl -X POST 'http://localhost:4000/chat/completions' \
-H 'Content-Type: application/json' \
-H 'Authorization: Bearer sk-1234' \
-d '{
    "model": "gpt-3.5-turbo",
    "messages": [{"role": "user", "content": "Hello"}],
    "user": "my-customer-id"
}'
The customer will be subject to the default budget limits (RPM, TPM, and $ budget). Customers with explicit budgets are unaffected.
Quick Start
Create / Update a customer with budget
Create New Customer w/ budget
curl -X POST 'http://0.0.0.0:4000/customer/new'
    -H 'Authorization: Bearer sk-1234'
    -H 'Content-Type: application/json'
    -d '{
        "user_id" : "my-customer-id",
        "max_budget": "0", # 👈 CAN BE FLOAT
    }'
Test it!
curl -X POST 'http://localhost:4000/chat/completions' \
-H 'Content-Type: application/json' \
-H 'Authorization: Bearer sk-1234' \
-D '{
    "model": "mistral",
    "messages": [
        {
        "role": "user",
        "content": "What'\''s the weather like in Boston today?"
        }
    ],
    "user": "ishaan-jaff-48"
}
Assign Pricing Tiers
Create and assign customers to pricing tiers.
1. Create a budget
- UI
- API
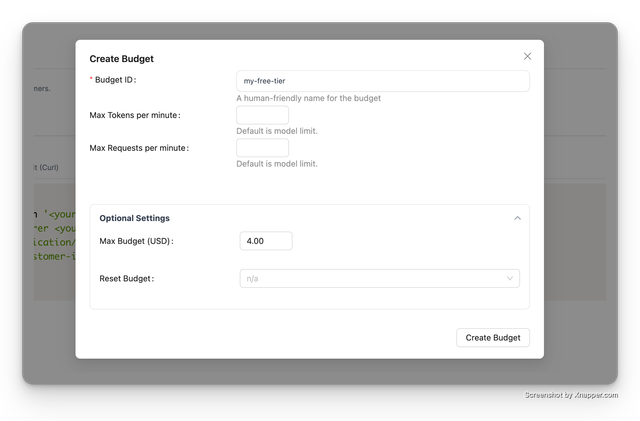
- Go to the 'Budgets' tab on the UI.
- Click on '+ Create Budget'.
- Create your pricing tier (e.g. 'my-free-tier' with budget $4). This means each user on this pricing tier will have a max budget of $4.
Use the /budget/new endpoint for creating a new budget. API Reference
curl -X POST 'http://localhost:4000/budget/new' \
-H 'Content-Type: application/json' \
-H 'Authorization: Bearer sk-1234' \
-D '{
    "budget_id": "my-free-tier",
    "max_budget": 4
}
2. Assign Budget to Customer
In your application code, assign budget when creating a new customer.
Just use the budget_id used when creating the budget. In our example, this is my-free-tier.
curl -X POST 'http://localhost:4000/customer/new' \
-H 'Content-Type: application/json' \
-H 'Authorization: Bearer sk-1234' \
-D '{
    "user_id": "my-customer-id",
    "budget_id": "my-free-tier" # 👈 KEY CHANGE
}
3. Test it!
- curl
- OpenAI
curl -X POST 'http://localhost:4000/customer/new' \
-H 'Content-Type: application/json' \
-H 'Authorization: Bearer sk-1234' \
-D '{
    "user_id": "my-customer-id",
    "budget_id": "my-free-tier" # 👈 KEY CHANGE
}
from openai import OpenAI
client = OpenAI(
  base_url="<your_proxy_base_url>",
  api_key="<your_proxy_key>"
)

completion = client.chat.completions.create(
  model="gpt-3.5-turbo",
  messages=[
    {"role": "system", "content": "You are a helpful assistant."},
    {"role": "user", "content": "Hello!"}
  ],
  user="my-customer-id"
)

print(completion.choices[0].message)